Wednesday, August 12, 2009

BOTS on ORKUT

Yeah, it is true. The BOTS haven't spared Orkut. If you are a frequent user of this Social Networking Site, the fact that Orkut has recently enhanced its security measures might not have escaped your notice. It now asks you for Captcha when you enter any URL in our status message or as part of a scrap. At the same time, if you send an alarming number of Friend Requests in a short span of time, you are asked again for Captcha, for each subsequent Request you send. For those unaware of the terminology, CAPTCHA is the technical term to describe the test where in you are shown an image, consisting of alphabets and numbers (often distorted so as to not look like the ones typed in the usual fonts) and asked to type the same in a text box. Well, Captcha was introduced so as to make sure that the user was actually a real person and not some software program; it was argued that a software program could not identify the characters from an image. As secure as it might sound, it is a fact that programmers/hackers around the world have outsmarted the captcha developers; and the sad truth is, the hackers have been aided by the developers themselves.

Well, I had suspected long ago that there was something fishy about Orkut's sudden interest in its security. However, it was only recently that I found traces of BOT activity in my Network, and began to delve into the subject further. To begin with I received friend requests from people who were already in my friend list. Evidently, their account was being cloned. Then again, I have received a lot of Friend Requests recently from unknown people, all of them with the same message.


Take a minute to notice the short message with the request.
Besides, you get those advertising scraps all the time; it is more often than not BOT activity.


What are BOTS?


Internet bots, are software applications that run automated tasks over the Internet. Typically, bots perform tasks that are both simple and structurally repetitive, at a much higher rate than would be possible for a human alone. If you have chatted on Yahoo, you are sure to have encountered a BOT sometime. Chatting bots can chat. Needless to say these BOTS have a limited vocabulary; they have a fixed set of responses that they send other users. It is pretty easy to tell apart a BOT from a human user merely by interacting with it for 2 minutes; it is bound to make irrelevant comments at some point.

What can BOTS do?
BOTS can be used for commercial purposes, advertising.
BOTS can be for spamming.
BOTS can be used to coordinate and execute an automated attack on networked computers, such as a denial of service attack.
BOTS can be used to bring down a Website's responsiveness by sucking bandwidth by downloading entire web sites and sending automated requests.

There are other capabilities of BOTS but I'd appreciate if you look those up on wiki.


Why Orkut?

Orkut.com is a social networking website owned by the industry giant GOOGLE.This means orkut is very big and anyone can take advantage of its millions of users to sell his products and services.

But it is not as harmless as it sounds. Needless to say, your privacy can be invaded by BOTS if they have access to your profile page, your scraps and your images. I've heard of instances where hackers with malicious intentions have grabbed such information about a user and opened bank accounts/ applied for duplicate social security cards with the victims' identites and done similar stuff, cheating them of their resources and often commiting crimes pretending to be the vicim. It can get bad!

BOTS can also be use to install virus or other spyware on your system which can in turn be used to eavesdrop on you and do stuff that you wouldn't want.


How do BOTS get past CAPTCHA?

I've hinted at the answer to this question above. I found this statement on http://jetbots.com, a software company which specializes in programming BOTS and selling them:

*CAPTCHA Bypasser
We have just teamed up with a third-party CAPTCHA service and integrated their service in all of our bots (optional). You need to buy credits from a 3rd Party website, imagetotext.com and just type your user/pass in our software (if you want the software to bypass the CAPTCHAs) and everything is automatic from there - Just like you type the CAPTCHAs manually, the software will bypass the CAPTCHAs. We have added this service in our bots because we know that CAPTCHAs' sucks :-) And on request of lots of our loyal customers, just like YOU :) Thank you.


It comes as no surprise.The Great Wall of China was so designed that it could not be breached. But it was breached only because the guard was bribed.


What can you do?

BOTS will be there; there's nothing we users can do about it. Only the website developers can do anything in this regard. We can only exercise caution when we accept friend requests from people we don't know. We must not put confidential content about ourselves that can be used to clone us. We must not click on links we don't trust. What else?

Monday, August 10, 2009

The Easy Proxy Switching Tool for Firefox : Multiproxy Switch

This document is particularly useful for people in Institutions where multiple Proxy Servers are deployed, for instance Engineering Colleges. In such places, often we feel the need to change the proxy configuration several times in the course of a small time interval primarily due to either or all of these reasons:

i)One proxy doesn't let you open Youtube or Rapidshare (or any other website for that matter) while the other does.

ii)The proxy server you're using is currently down.

iii)Certain Websites are cached on one particular proxy server so they're faster if accessed using that Proxy Server.

iv)You like switching between proxies and you do it for the heck of it.

As the title might have suggested, this post is about using an addon in Firefox to do the task of switching proxies easier. If you are curious enough, you might've already googled on this topic or searched for Firefox addons from the Firefox>Tools>Addons applet. There are a number of addons to achieve the task at hand, namely SwitchProxy, MM3-Proxy Switch, Quick Proxy, Foxy Proxy, xyzProxy, Ticon, ProxyFlag, ProxySwitch; the list is quite long. The particular addon I use and I recommend using is “MultiProxy Switch”, and I list the reasons for this choice I made:

i)Most of the addons in the list are meant for only one proxy and they merely toggle it on/off which makes them useless for use in a multiproxy environment.

ii)SwitchProxy, perhaps the uncrowned king for achieving the task has not been updated since 2007. Firefox, on the other hand has been evolving rapidly ever since and its latest version 3.5.2 hit the world recently. Needless to say, SwitchProxy is not compatible with the later versions of Firefox.

iii)Most other addons are also incompatible with the latest Firefox.

iv)Foxy Proxy performs the task but it is a pain in the butt to configure it properly. It has no No-Proxy list which you can edit; rather it asks the user to manually feed in regular expressions/ wildcard sequences of instances of URLs and black-list/white-list them. This is a cumbersome task and not all of us are comfortable with wildcards and regular expressions. After spending half an hour trying to add the blacklists, I was frustrated at the sight of some websites being refused by the proxy server.

v)Multiproxy Switch is easy to manage, easy to configure.

vi)Multiproxy Switch is an experimental addon. Experimental add-ons are newer add-ons which have not yet undergone our public review process. They are allpha or beta versions. I like to try out new stuff; It is only by experimenting do you get to know the rules of the game.

Doing It. Adding the Addon.

Step 1: Go to https://addons.mozilla.org/en-US/firefox/addon/7330

Step 2: Check on Let me install this experimental add-on. Hit Add to Firefox.

Step 3: Restart Firefox to complete the installation.


Configuring it. Adding Proxies.
.
Ideally, after the installation, you must have a Multiproxy Toolbar below the address bar and a button in your Status Bar.
I personally don't like to dedicate my browser space to addons, so I use the smaller interface: the Status Bar Button and hide the Multiproxy Toolbar. You could let the Toolbar stay if you wish or right click on the toolbar and uncheck it, to hide it. You can see it again by right clicking near the Menu Bar and checking it again.

Multiproxy ToolBar:


Statusbar Menu:


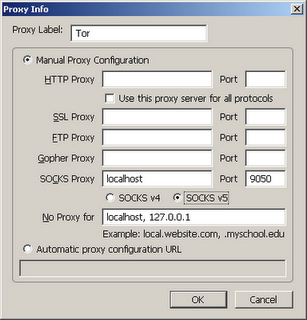
Now, to add proxies, select "Manage Proxies" in Toolbar or Statusbar menu, you will see this window:


Click Add Button.


Now, you fill in the specifics and hit OK.


Switching Between the Proxies.

After you add the proxies, you will see them in the Status Menu and Toolbar Menu, just click one to use. In Toolbar Menu, select the proxy then click "Apply" button to use.

Enjoy

Monday, July 6, 2009

Accessing Operating System Environment Variables in Apache (Fedora)

I was facing the problem of accessing the Operating System Environment Variables in Apache. After searching a lot, I got to know that there are environment variables in apache too. Although these variables are referred to as environment variables, they are not the same as the environment variables controlled by the underlying operating system. Instead, these variables are stored and manipulated in an internal Apache structure.

For setting the operating system environment variables to be used by apache, we will export these variables to the apache server when it starts. The procedure is as follows :

0. Switch to root.

1. Open /etc/init.d/httpd in vim

vim /etc/init.d/httpd

2. You will find following lines

# Source function library.
. /etc/rc.d/init.d/functions

Open /etc/rc.d/init.d/functions in vim

vim /etc/rc.d/init.d/functions

3. You will find following lines

# Set up a default search path.
PATH="/sbin:/usr/sbin:/bin:/usr/bin"
export PATH

Now append whatever environment variables you want to set and accessed by apache.

VAR="/path/to/var"

export VAR

For example,

LD_LIBRARY_PATH=/usr/local/lib:/usr/local/cuda/lib
export LD_LIBRARY_PATH

You could have added these lines anywhere in the file.

4. Save the file and restart the apache server.

/etc/init.d/httpd restart

Hope it helps. I will add the fix for Ubuntu soon.

Sunday, June 28, 2009

SVN Proxy Settings

Subversion (SVN) is a version control system used to maintain current and historical versions of files such as source code, web pages, and documentation.

If you are behind a proxy you will have to set the proxy before using svn.

The procedure for the same goes as follows :

1. Open "servers" file located in ".subversion" directory in your home directory.

vi ~/.subversion/servers

2. You will find following lines of code located in the file

[global]
# http-proxy-exceptions = *.exception.com, www.internal-site.org
# http-proxy-host = defaultproxy.whatever.com
# http-proxy-port = 7000
# http-proxy-username = defaultusername
# http-proxy-password = defaultpassword

Set the appropriate values and remove the '#' from the beginning. Make sure you don't leave any whitespaces at the front of the lines being edited.

After editing the code will look like

[global]
http-proxy-exceptions = *.exception.com, www.internal-site.org
http-proxy-host = defaultproxy.whatever.com
http-proxy-port = 7000
http-proxy-username = username
http-proxy-password = password

3. Save the file and exit.

You are now ready to use svn.

Friday, June 26, 2009

Setting NumLock on automatically in Fedora

The NumLock is not activated by default at start-up (in FC-9/10). I am not sure of the fact in other distros. Everytime when the computer starts, you have to manually activate the NumLock key.

The following solution works :

Execute the following commands as root in a terminal.

1. Install numlockx

yum install numlockx

or

Install using numlocx rpm.

rpm -ivh numlockx*.rpm

2. gedit /etc/gdm/Init/Default

3. At the end of the file you will find a line like

exit 0

Above this line add the following code

if [ -x /usr/bin/numlockx ];
then /usr/bin/numlockx on
fi

4. Save the file and restart the computer.

You will find the NumLock activated by default at startup.

Wednesday, June 17, 2009

Booting Windows From Grub Menu

Many of you have tried installing Fedora or Ubuntu on your system. It gets installed very gleefully and when asked to reboot , you try booting to windows and it does not boot. Plain as that, you think that you have lost Windows completely , probably due to some wrong selection of drive while installing Linux.
But the battle is not yet lost. You can still boot windows from the grub command line. The thing is as simple as the following four commands-->
  1. grub> rootnoverify (hd0,1)
  2. grub> makeactive
  3. grub> chainloader +1
  4. grub> boot
Then again as I once faced the problem myself , the windows on your pc may not always be on the partition (hd0,1). In my case it was (hd0,4).So incase you have no idea where to find out where the Windows is installed , you can always open the grub.conf file in linux to see it or as I did in my case I tried hit and trial to find out it was 4 (the magic number).

This has worked for me everytime I have encountered this problem and I just hope It works for you too!.

Configure BSNL EVDO DATACARD on Ubuntu

Since BSNL has released its EVDO internet accessing data card, it has gained a lot of popularity amongst the users. Needless to say people may face many difficulties configuring it for ubuntu. But then again, it's these challenges that keep the linux users up and moving.

Cutting straight to the point, configuring it for ubuntu may be as simple as the following four steps:
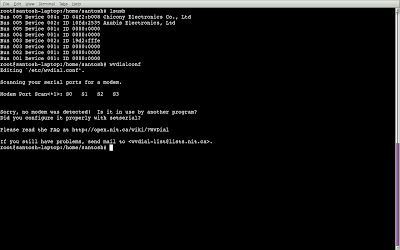
1.In superuser mode, type lsusb at the shell prompt.
root@santosh-laptop: lsusb.

This will list all the usb ports on your pc.

2.Then at the shell prompt type in the command
root@santosh-laptop:wvdialconf.

If this works, it will say modem detected at some port.But life again ain't so easy.It may well not recognise any modem and give a output something like below:


Now to overcome the problem you have to make the following changes:

1.Remove comment on the below lines in /etc/init.d/mountdevsubfs.sh:
mkdir -p /dev/bus/usb/.usbfs
domount usbfs '''' /dev/bus/usb/.usbfs -obusmode=0700,devmode=0600,listmode=0644
ln -s .usbfs/devices /dev/bus/usb/devices
mount –rbind /dev/bus/usb /proc/bus/usb.

Note: The above lines will be found in the do_start() function.

2. Now type in the following command:
modprobe usbserial vendor=0x05c6 product=0xfffe

Now the vendor and the product id may be different for your data card. You have to find that out for yourself.

Hint: These numbers were listed in my lsusb output ---> 19d2 and fffe. Just add 0x before them to make them hexadecimal.

3. Now again type in the command wvdialconf at your shell prompt.This will edit the file /etc/wvdial.conf. Open it using any editor and make in the following changes:
type in--> Stupid Mode = 1 at the end of this file.
Also type in the username and the password infront of the username and password row. Type in your phone name as #777.

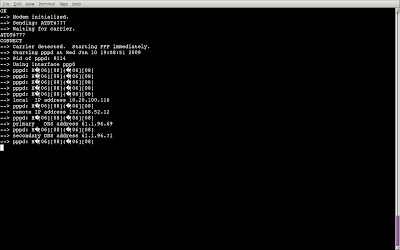
4.Now type in the command wvdial at the shell prompt:
root@santosh-laptop:wvdial

Hurray !! your net has been connected and it looks something like this:


Acknowledgement: Thanks to Santosh Mukherjee (sam.sensation@gmail.com) for writing this post.